
Over the past week had some time to work on Flickerbooks back pay calculator. It is now more intuitive and I was able to ditch a lot of code, as the way I have coded previously was not the most efficient way of doing it. So first let’s have a look at how the old back pay calculator use to work.
Old back pay calculator
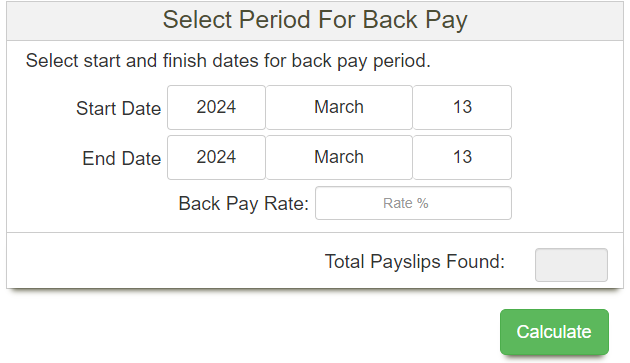
In order to calculate back pay on the old version, there were two steps:
- First you had to select the time period for the back pay to be calculated.
- Once the payments had been retrieved and loaded into the results table, a user could then select which payments to include into back pay calculation by marking a checkbox. Once this was done a back pay could have been calculated.
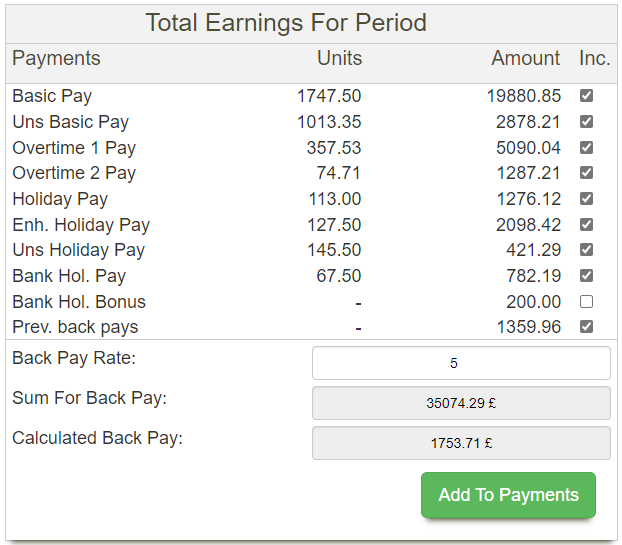
This approach had several flaws like:
- All values were kept in a separate variables (data was not structured and it made it impossible to loop it, for example basic pay amount and units were stored in two separate variables).
- Check boxes had to be created to allow user select if a payment has to be included or not in the back pay calculation. On small screens this made the table look cramped.
- In order to calculate back pay two AJAX calls had to be made to back end: one would retrieve the payments for the selected period, and the other would calculate back pay with the provided back pay rate and selected payments.
- The old back pay table was created using <div> elements instead of <table> element.
All these issues were sorted on the new version of back pay calculator.
New back pay calculator
The new back pay calculator only makes one AJAX call to back end, as the input field for back pay rate has been added right after the start and end dates for back pay.
This also means that the back pay calculation has been moved from back end to front end. I was able to move it to front end, because now the back pay results are sent to front end in a structured manner and it is possible to loop it.
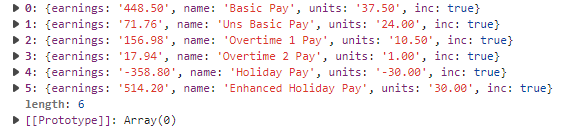
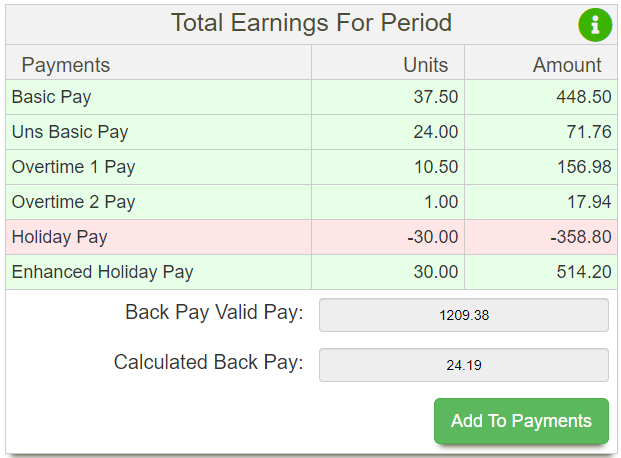
Now when a user selects dates for back pay and provides a back pay rate, a table gets generated with results like these:
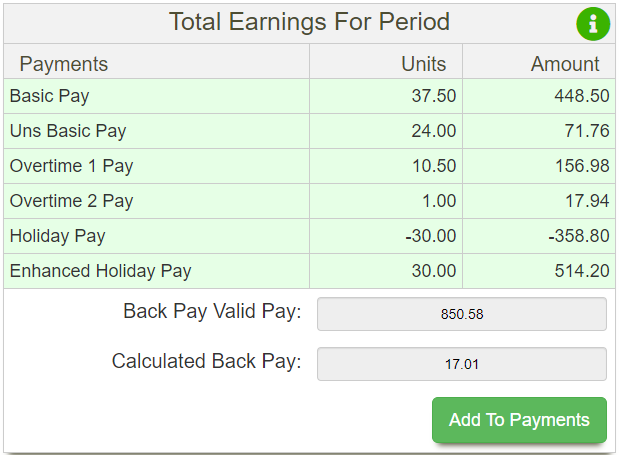
If there is a payment that should not be included in the payments, a user just has to click on the table row that contains the payment, and it will be removed from the calculation. This is possible to do, as when the results are retrieved from back end, I store the back pay payments in a global variable named storeBackPayPaymentsData, so it is possible to access it via other JavaScript function named recalculateBackPay(). Once a user clicks on a row, recalculateBackPay() function is called and a new value for back pay and back pay valid payments sum is calculated, and the row that is not to be included in the calculation gets marked in red colour.
The code for recalculateBackPay() function is demonstrated below:
// a function that recalculates back pay when a user clicks on a row in the back pay table
const loadBackPayValues = backPayValidPamentsSum =>{
	let backPay = backPayValidPamentsSum*storeBackPayRate/100;
	document.getElementById("totalAmountForBackPay").value = "";
	document.getElementById("backPayAmount").value ="";
	setTimeout(function(){
		document.getElementById("backPayAmount").value = backPay.toFixed(2);
		document.getElementById("totalAmountForBackPay").value = backPayValidPamentsSum.toFixed(2);
	},500);
}
//it either adds payment to back pay or removes it. Also changes the color of the row red: not included, green: included in back pay
const recalculateBackPay = x=> {
	//first get the inc value in the array for the selected row
	let incValue = storeBackPayPaymentsData[x]['inc'];

	//this is used to pick up all rows, and then to change the color of the one that has been clicked.
	let tdElements = $("#totalEarningsTableBackPay").find("tr");
	if (incValue){
		//change value to opposite
		$(tdElements[x]).fadeOut(0);
		storeBackPayPaymentsData[x]['inc'] = false;
		$(tdElements[x]).removeClass("inc");
		$(tdElements[x]).addClass("noInc");
		$(tdElements[x]).fadeIn(1000);
	}else if (!incValue ){
		$(tdElements[x]).fadeOut(0);
		storeBackPayPaymentsData[x]['inc'] = true;
		$(tdElements[x]).removeClass("noInc");
		$(tdElements[x]).addClass("inc");
		$(tdElements[x]).fadeIn(1000);
	} else {alert("Something went wrong!")}

let backPayValidPamentsSum = 0;
	for(let z=0; z<storeBackPayPaymentsData.length;z++){
		if (storeBackPayPaymentsData[z]['inc']){
			backPayValidPamentsSum+=Number(storeBackPayPaymentsData[z]['earnings']);
		}
	}

	//recalculate back pay:
	loadBackPayValues(backPayValidPamentsSum);

	//if all rows are set to red, need to update the height of the table as add to payments button gets hidden
	if (backPayValidPamentsSum == 0){

		$('#addToPaymentsButtonRowLimbo').addClass("hidden");
		animateTableHeightTest(
			document.getElementById("totalEarningsTableBackPayAnimation"),
			document.getElementById("totalEarningsTableBackPayAnimationLimbo").offsetHeight
		);
		//hide the button after the animation is completed!
		setTimeout(function(){$('#addToPaymentsButtonRow').addClass("hidden");},animateTableHeightDurationTest);


	} else {
		$('#addToPaymentsButtonRow').removeClass("hidden");
		$('#addToPaymentsButtonRowLimbo').removeClass("hidden");
		animateTableHeightTest(
			document.getElementById("totalEarningsTableBackPayAnimation"),
			document.getElementById("totalEarningsTableBackPayAnimationLimbo").offsetHeight
		);
	}


}
Summary
The new back pay calculator is a lot more user friendly and it is done with a lot less code, as since the data is now retrieved from back end in a structured way, I’m able to write functions that can loop the results. Main advantages of the new back pay calculator are these:
- Less code at front end (reduced the size of JavaScript file).
- Instead of two AJAX calls to calculate back end now only one is done.
- Data at back end is now structured in an array which makes it easy to loop it.
- No more need for check boxes to add or remove payments to back pay (one column less in the table which results in table having a better look on small devices).
- Replaced <div> elements with <table>,<tr> and <td> elements. This allows the results table to be copied and pasted into email.
- Back pay can be recalculated just by clicking on the row in a results table.